Monday, March 18, 2013

Getting A New Kiln? Some Things to Consider

Frequently I get messaged by beginners, "Kiln Master Joe, I'm considering purchasing my first kiln, what kind would you recommend?"

So I decided to list five aspects you should consider before embarking on your search.  This information can become complicated, so I'm going to try and keep this as simple as possible.  Keep in mind, if you're uncertain about how to determine any of your electrical configurations mentioned below, it's best to consult your service provider, a licensed electrician, or me!

Kiln Size:
First ask yourself which kiln size will meet your needs.  Do you need something very tall?  Or perhaps you need something wider than taller?  Are you firing small items?  Maybe all you need is a small 120 volt test kiln to meet your needs.
I recommend shopping the websites of recommended kiln manufactures, visiting your local supply store (if they have a showroom), or visiting a local ceramics/glass class to get a better sense of what size you need.  Once you have a good sense of which size you'll need, you can move onto the next step.

Voltage:
All too often I hear people purchase a kiln and learn that it doesn't match the power of their studio.  Before you purchase your kiln, find out if your power supply is equipped with 208 or 240 volts of power.  I hear customers often say, "I have 220 volts of power." which is a vague term.  Kilns are wired specifically for either 208 or 240 volts, and so is your studio.  If you're not sure how to find this out you can examine your breaker box, which usually contains the info.


Phase:
Next you'll need to confirm what phase you have available in your space.   Without getting too complicated, phase refers to the distribution of electric power.  Kilns are manufactured to handle single phase or three phase.  Just like your voltage, if you're not sure how to find out your phase, you can examine your breaker box, which usually contains the info.

* Changing your voltage or phase is no cheap task.  Therefore, it's best to find out what voltage and phase you have, then seek a kiln that matches the correct electrical configuration.

Wire & Breaker Size:
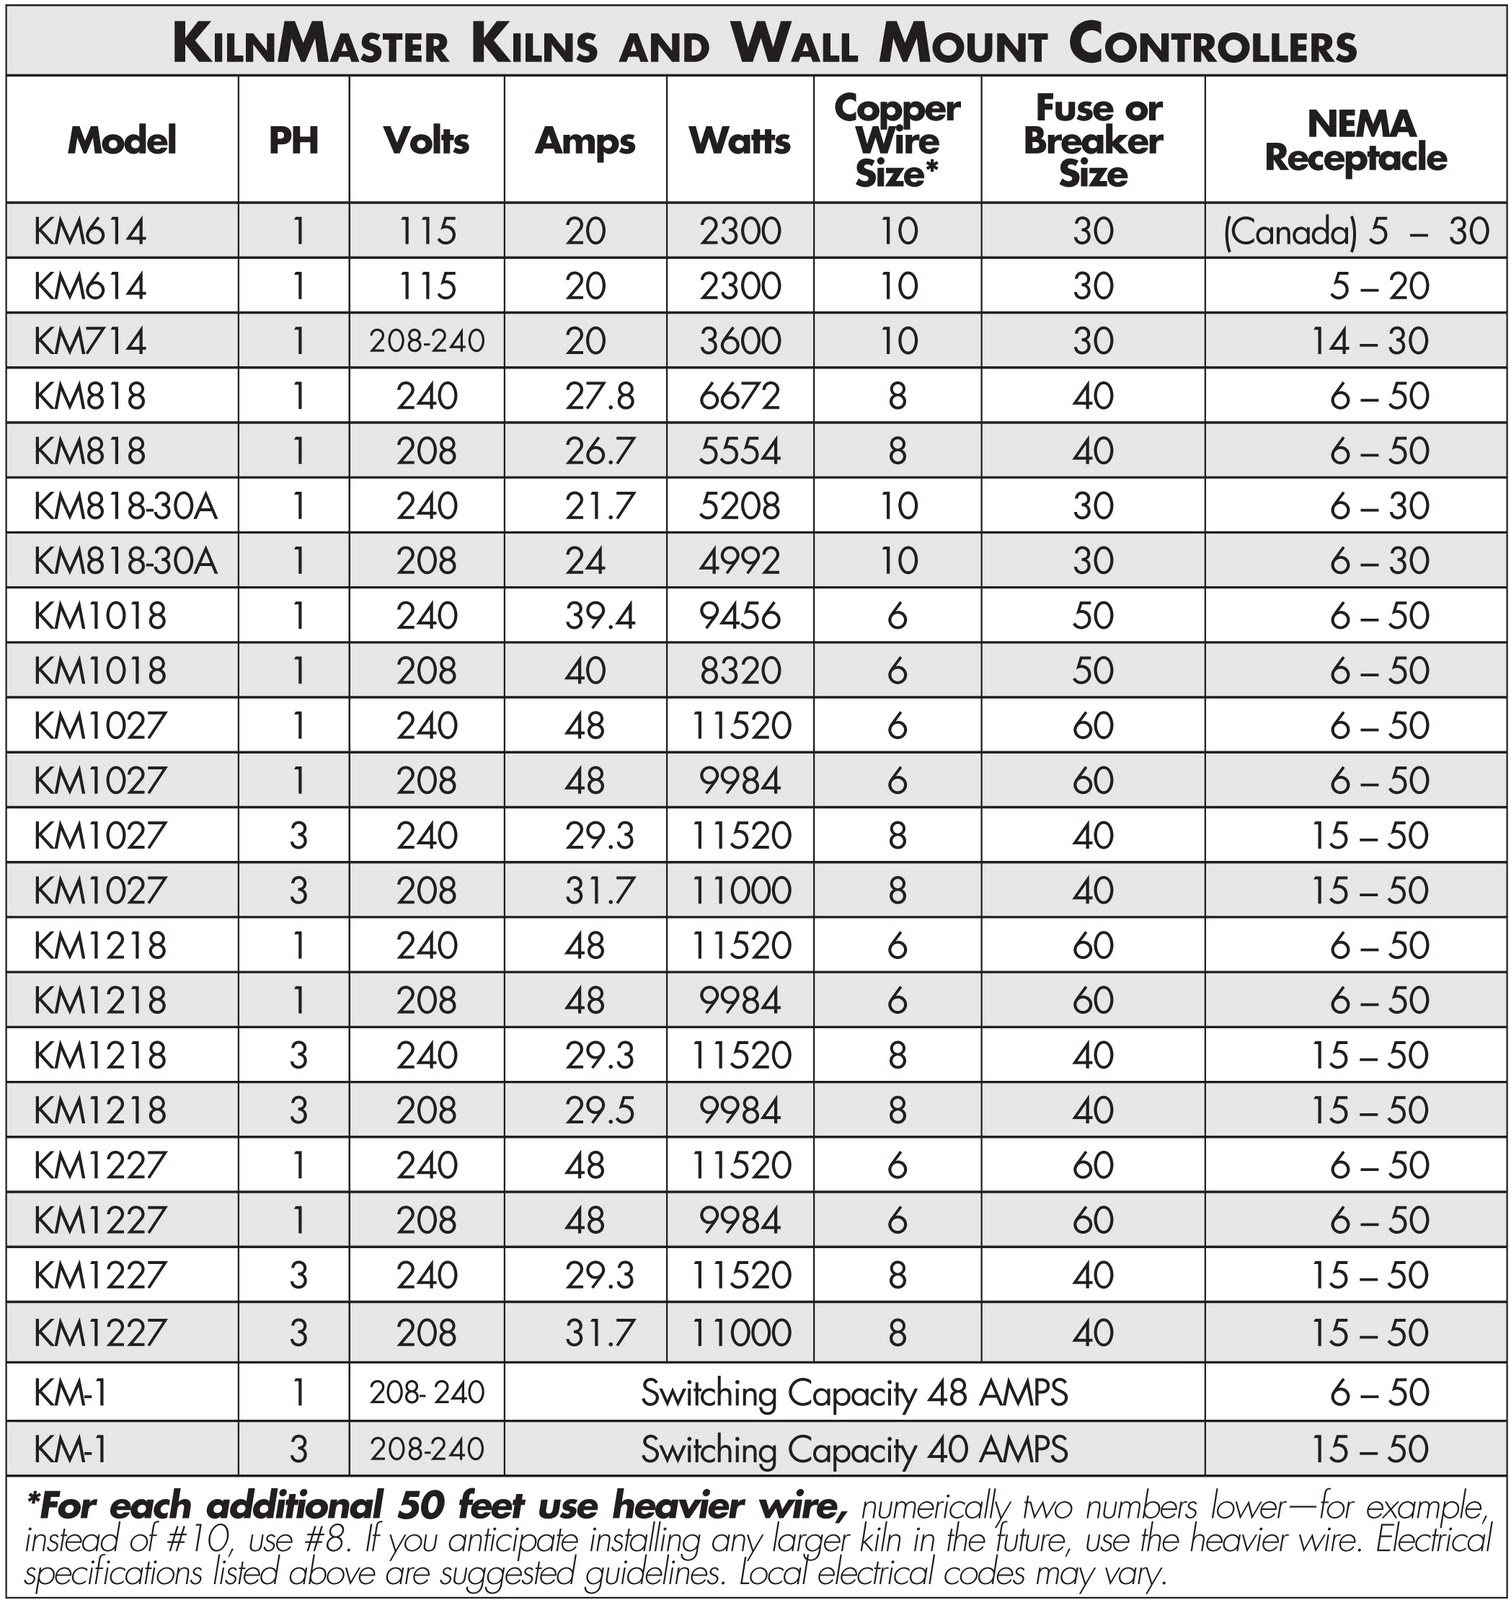
Don't take your electrical work for granted.  Every kiln needs a particular wire gauge (thickness) and breaker size necessary for the kiln's electrical demands.  If your not sure which electrical configuration you need for your kiln, refer to Skutt's electrical requirement chart above for easy identification.  If you don't have the correct wire and breaker size, you'll have to hire an electrician to install the correct sizes.


New or Used:
Depending on your financial situation, you may want a new or used kiln.  An automatic (or digital) kiln is the most expensive, less common to find used, but easiest and most convenient to operate.  Manual kilns come in plenitude, are cheaper, but require some skill (especially when firing bisque).  The downside to purchasing a used kiln is that unless you know a lot about kilns, you won't know what condition your kiln is in.  If you're looking for a used kiln, Craig's List is an excellent local resource.
* If you're purchasing a kiln to work with glass, your best bet is to acquire a digital kiln, as you'll need complete control of your firings (increase in temperature, hold, and rate of cooling).

Finding answers for the issues above will help narrow down your kiln choices.  So just to recap and simplify this post, when purchasing a kiln first consider...

  • Kiln Size
  • Voltage
  • Phase
  • Wire & Breaker Size
  • New or Used

This is a lot of info, and for the beginner it can be overwhelming, but knowing this information ahead of time can save you a lot of time, energy, money, and aggravation in the future.  You're better off figuring this out ahead of time, rather than spending your time and money, only to find out that you don't have the right kiln for your space.

Don't hesitate to contact me with questions.  Good luck!

Sunday, November 6, 2011

Cone Sitter Kilns vs Digital Kilns

People often ask me what the difference is between electric automatic kilns and electric manual kilns.  Digital kilns offer a lot in convenience.  However, in my own studio I'll always have one or two manual kilns because they offer some advantages that the digital kilns don't.
Manual Kiln Pros:
  • Less electrical components to replace.
  • No error message to stop your firings.  Let's say you have an old kiln and it needs extra time to reach target temperature, but it will get there.  The manual kiln won't get shut off by the computer, which is designed to monitor the rate of temperature increase, and halt the firing if the increase is slower than it's supposed to be.
  • You can stack or remove your kiln rings.  This comes in VERY handy if you plan to fire different sized loads.
  • You have the option of setting up a wall mounted digital controller, which let's you use the best of both worlds.

Digital Automatic Kiln Pros:
  • No need to "baby sit" your kiln, as the controller does the firing for you.
  • Convenience of customized programs.  This allows you to fire the kiln in the EXACT amount of time you desire.
  • More firing features such as delay and hold time.  Delay and hold come in very handy for ceramics, and are absolutely necessary for glass.
  • Error messages.  Although I listed this in the last category as a hindrance, error messages can actually provide some valuable information if your kiln were to malfunction.
  • Built in temperature display.  Gotta love knowing what temperature your kiln is currently at.
So there's actually more benefit to having an automatic kiln, and if I were to setup a new studio, that would be my first choice.  However, there ARE advantages to having a manual kiln.  
Then there's the Firemate model kiln made by Cress...


These Firemate kilns are automatic, but not digital!  Cress is the only manufacturer who makes an electric kiln, which operates by a motorized thumbwheel.  This thumbwheel slowly increases the temperature of your kiln until it reaches target temperature. This still doesn't offer some of the conveniences of an automatic digital kiln, but is a step up from the standard manual kilns.

In an ideal situation, I'd choose to have one automatic kiln, one manual/stackable kiln, and one Firemate kiln.  This kind of setup would allow you to have the best of both worlds, and a variety of options depending on your firing needs.

Friday, October 28, 2011

What About Slab Rollers?


I've been asked this question a lot recently, so I figured I'd touch on the subject briefly. Brent and North Star are brands I would highly recommend. Brent is more expensive, but built solid like a Cadillac. North Star is cheaper, but still a very good alternative to Brent. Although I've heard some people say negative things about North Star, I've been using them for eight years now and I think they're great! Never had a problem.  Bailey is another popular company, and they seem to make a good product, but I don't have any personal experience using them.


Ceramic Supply slab rollers are the ones to avoid. They have a pretty good design, but it's made with cheap parts. Plus every time I've had to repair one, it's such a pain in the ass to get them to call me back and answer my questions... I just want a price and item number for chrissake! One time I had to put a little fire under their pants, so to speak, just to get them to send out a part. I placed the order and it took two weeks to get them to send it out. Why does it take two weeks for them to receive the order, pack it, and send it off? They were just sitting on their hands! The company is run by a bunch of gremlins or something...

Friday, October 22, 2010

Electric Cone Ten

Thinking of doing a cone ten firing in your electric kiln? You should know what effect it will have on the kiln's elements (heating coils).

Although most electric kilns for ceramics can go to cone ten, it's not the most practical way to fire your kiln. Often times if a kiln CAN reach cone ten, it's the kiln's maximum temperature. The more you fire to the maximum temperature, the more likely you'll wear out those elements. To give you better perspective, checkout the information from Skutt kilns below. This chart presents the number of firings you can expect from a BRAND NEW 1027 kiln. As noted in a previous post, brick thickness really counts, so here are the estimated firings for a 2 1/2in brick and then with a 3in brick kiln...

KM1027 with 2 1/2in brick
cone 04: 1500+ firings
cone 6: 200+ firings
cone 10: 35-40 firings

KM 1027 with 3in brick
cone 04: 1500+ firings
cone 6: 350 + firings
cone 10: 80 firings

As you can see, those cone ten firings really wear out the elements. That's why cone ten firings are most ideal for gas kilns. Personally I love the look of porcelain fired to cone ten, but my studio isn't equipped with a gas kiln. When I do cone ten firings in my own studio, I have one specific kiln I use just for cone ten and it's small. This way when the time comes I need to replace the elements, it doesn't cost me as much as it would if it were a larger kiln. Otherwise, if I had a gas kiln, I wouldn't bother using an electric kiln for cone ten.

Friday, May 21, 2010

My Brick is Bigger Than Your Brick!

Brick size may actually matter depending on what temperature you're trying to fire to. Firebrick, or soft brick as they're called, come in either 2 1/2in or 3in thickness. Check what size your brick is by measuring the ledge of your kiln like in the pictures below.


If your firing to cone 10 or even cone 5, I'd recommend getting a kiln that has 3in brick. It provides 1/2in of extra insulation around the whole kiln, although it doesn't seem like much, it actually makes a difference.

If you're firing to cone 05 for the most part or cone 5 max, then 2 1/2in brick is just fine. At cone 5 using 2.5in brick, your kiln will be losing a bit more heat than if you were using 3in brick, but it will still get to temperature.

Personally, if I had a choice in my own studio, I'd use nothing but 3in brick kilns. Because although I glaze at 05 for the most part, it's nice to have the extra insulation in case I want to fire higher.

I should also mention there is no difference in strength between 2.5in and 3in brick.  They are both equally fragile, thus the name "soft brick."  The only difference is more insulation; for retention of heat in higher firings.

Tuesday, March 16, 2010

Ventilation is Paramount


Ventilation is paramount. If you're setting up a kiln area, you should take some time to consider how your kilns will be ventilated, especially if you're doing ceramics. Generally, kiln ventilation for glass annealing isn't as necessary as ceramic kilns. For the ceramist, it's important you know that clay, glazes, and lusters will emit moisture and fumes such as carbon monoxide, formaldehyde, and sulfur dioxide into your kiln room. So ask yourself, once emitted, where is it going to go? Because not only can it be harmful to you, but as you can see in the pictures above (all the brown and green crusty stuff), poorly ventilated kilns can result in corroded electrical work and exterior damage (image below).

Here are several solutions to ventilating your kilns provided by Skutt manufacturing. These are ranked in order of sophistication (from cheap to expensive):
• Natural ventilation from open doors and windows in the room.
• Room ventilation fans.
• Convection canopy collection hoods.
• Mechanical fan collection hoods.
• Mechanical downdraft vent systems.

Natural window ventilation, fans, and convection hoods are passive; the warm fumes enter your kiln room, rise, and hopefully, are diluted or escape. This requires very large volumes of fresh air and doesn't prevent electrical or exterior corrosion on the kiln.

Collection hoods with electric fans do a better job of removing fumes, but fumes still enter the room air before they are collected. There is usually still a significant odor and external hoods do not help internal kiln performance. Also they don't prevent electrical or exterior corrosion either.

Mechanical downdraft systems were developed to address all needs. It removes fumes directly from the firing chamber before they enter the room, posting a health hazard to you or the kiln. Little or no odor can be detected. Plus it increases temperature uniformity within the kiln, which results in more consistent firings.

Mechanical downdraft systems are the best solution to date for venting kilns, which is why it's become standard for kiln manufacturers to use them. Although it can be pricy (especially if you have multiple kilns), it's definitely the most effective way to ventilate. Listed below are three companies and their vent systems.
For more information about venting, I recommend reading Skutt's venting FAQs:
http://www.skutt.com/support/venting_faqs.html
If you don't have money for a vent system make sure you know what to do with peepholes.

Sunday, November 15, 2009

Everything is MELTED!

Melted glass or clay is a fairly common blunder. I’ve seen entire kiln loads completely melted/adhered to the kiln chamber; rendering the users kiln into (what some might consider) a piece of art! You as the user must be responsible for your kiln usage and the materials you use.

Clay people:
Be fully aware of what firing temperature your clay can go to. If your not sure, make a little tray out of cone 10 clay, place a small amount of the questionable clay into the tray, and fire to the desired temperature.
Glass peeps: M
ake sure you’re around to witness the kiln firing to completion so you know it doesn’t overheat. This actually applies to clay people too.

EVERYONE should coat kiln wash on their shelves and kiln floor to be on the safe side. It's much better to rip melted chunks from your kiln with kiln wash attached rather than fire brick.

If this melting happens to you, don’t beat yourself up. Overfiring happens to MANY people. Soak it up, and remember just about anything can be fixed, unless you’ve turned your entire kiln into beautiful art.